Showing posts with label food. Show all posts

Friday, April 12, 2024

A Sugarless Chocolate Milkshake

Photo: Unsplash
I've been making some version of a chocolate milkshake for years. If consumed as a quick meal, I'll toss a scoop of whey chocolate protein powder into a cup of skim milk with ice and drink it. 

Today let's make a healthy, thick chocolate milkshake as a snack. It has the protein of milk and potassium of a banana but for a meal, I need additional whey protein. 

Ideally, a healthy snack should be 100 to 200 calories and not more. The banana gives the milkshake its thickness, but the unsweetened cocoa powder will dominate its flavor. Here's the recipe:

Healthy Thick Chocolate Milkshake

Ingredients:

1 - 1 1/2 cups skim milk - Start with 1 cup and test the thickness. If you think ahead to use frozen banana slices, you'll need the extra milk.
2 tablespoons of cacao powder, or dark cocoa powder, unsweetened
1 large banana If you want to slice and freeze your banana ahead of time, you can skip the ice cubes. But who always thinks ahead when you crave a snack?
4 ice cubes

Directions:

Toss the milk, cocoa powder, banana, and ice cubes into a
blender and mix until you get a rich, thick, and delicious milkshake. At this step, you can add the extra 1/2 of milk if the shake is too thick. Pour into a tall glass. If you need to gain weight lucky you, you can garnish with extras like nuts, seeds, chocolate shavings, or whipped cream. I drink my milkshake as is. It's still tasty!

Yes, you can make this milkshake with oat milk, almond milk, or soy milk. My favorite is cow's milk, which has 8 grams of protein per cup.  

Skim milk is 90 calories per cup, the banana is about 100 calories (usually I use a medium banana so 70 calories) and the cocoa powder is 50 calories, so our milkshake is over 200 calories but not by a significant amount, and they aren't empty calories. Personally, I'm mindful, yet not obsessive when counting calories. My aim is to stay in the ballpark. When hungry, I consider vegetables, fruit, or skim milk -- free food, never fretting over the few extra calories they contain. 

Enjoy!


You may also enjoy:

Thursday, March 28, 2024

Oatmeal is Healthy And Versatile

Royalty free photo
As we wind down the days of nippy (and rainy) weather to enter the balmy sunny days of spring and summer, I find myself eating creamy oatmeal for dinner. I toss 1 cup of dry 1-minute oatmeal flakes and water into a bowl and microwave it for 2 minutes. After the microwave cooks the oatmeal, I add 5 to 6 tablespoons of dry powdered milk to the mixture. Sometimes I also sprinkle in Stevia or honey and cinnamon, but often I don't. It's my favorite way to eat oatmeal. The dried powdered milk adds creaminess and light sweetness. Usually, several hours later I'll snack on hummus and saltines, slices of extra sharp cheddar, fruit, baby-cut carrots, peanut butter on crackers, or Misu soup with mixed vegetables. It varies. 

Oddly enough, I don't eat oatmeal for breakfast, but occasionally as a quick dinner. Oatmeal with milk is an easy-peasy comfort food, relatively filling, and a good sometimes meal without much preparation or cleanup. It contains a decent amount of protein and lowers bad cholesterol in the body. My mother was told by her doctor to eat a bowl of oatmeal several times a week to lower her cholesterol, which she followed and after a time her doctor was able to wean her off of Lipitor, a necessary cholesterol-lowering drug. Oatmeal is a good fiber-rich food to work into a diet.

People make the mistake of buying single packages of instant oats when 1-minute or 5-minute oatmeal flakes quickly cook in a microwave just like the more expensive less healthy instant oatmeal. Knockoff brands from Amazon Walmart or supermarkets are great too and cheap. You can then add healthy ingredients like berries or nuts to it if you wish.

Another way I use oatmeal is in most recipes that call for breadcrumbs. Oatmeal comes in a big size while breadcrumbs come in much smaller quantities. I don't tend to stock breadcrumbs.

Next, I'll have to make this YouTube influencer's savory oatmeal dinner. With chopped vegetables, milk, eggs, water, and grated parmesan cheese, it looks easy and scrumptious!

BAKED OATS (makes 6 slices)
Ingredients:
2 cups rolled oats (180g) 1/4 cup ground oats, or oat flour (25g) 1 tsp baking powder 1 cup milk, dairy or non-dairy (240ml) 1 cup water (240ml) 2 eggs 1 tsp salt
1/4 tsp black pepper 1 tsp Italian seasoning 1/2 cup grated melting cheese - gouda or cheddar cheese (50g) 1/4 cup grated parmesan cheese (20g) 1 medium onion 2 cloves garlic 1 small zucchini (130g) 1/3 cup frozen peas (50g) 1/2 cup diced tomatoes (80g) NUTRITIONAL INFO (per slice): 223 calories, fat 7.9g, carb 27.3g, protein 11.4g Preparation: First, saute onions and garlic over medium heat for 3-4 minutes, then add sliced zucchini and frozen peas and cook for the next 3-4 minutes. Add rolled oats and toast for 5 minutes, to develop a lovely nutty flavor. While it's cooling down, prepare the wet mixture. In a bowl add, eggs, milk, water, salt, black pepper, Italian seasoning, grated gouda or cheddar cheese, and ground oats combined with baking powder, and mix it well. Now, add the vegetables and toasted oats and stir well together. Let it sit for 10 minutes. Grease your baking dish with some butter and pour the mixture in. Bake at 350F (180C) for 40 minutes. Let it cool for 10-15 minutes, then cut into 6 equal pieces and serve with spoonful of Greek yogur
t and a drizzle of hot sauce.

Tuesday, March 26, 2024

3 Low-Tech Cookers Worth The Money


If you have a stovetop you're all set, so why buy extra cookers? 

Well, because the following 3 appliances do their jobs of cooking their specific food better than pots and pans on top of a stove. Plus they're low-tech and super cheap, which makes their respective ease and efficiency worth considering. Let's take a look:

1) An Egg CookerWhen I first saw egg cookers on the market I thought how ridiculous to buy a special gadget to boil eggs, but I've changed my mind! The reason is you can cook either hard, medium, or soft boiled eggs perfectly every time. Not so in a pan of boiling water on a stovetop, where the results of getting the eggs cooked just right can be mixed. Cooking time is less using the egg cooker also because you use far less water. You pour a small amount of water into the egg cooker which quickly brings the water to a boil. A see-through cover lets the eggs steam until the water disappears which activates an alarm telling you the eggs are done. To clean, just raise the parts with tap water as they get steamed, not dirty. 

Egg cookers come in mini, small, medium, and double-decker sizes corresponding to how many eggs you need to cook at once. They'll also make a custard, though I don't plan to utilize this function.

2) Rice Cooker - Again initially I thought what's wrong with just simmering rice in a pan on a stovetop? Nothing ... but a rice cooker steams the rice perfectly every single time and you can serve it in the very same cooker. I selected the Progressive Prep Solutions Microwave Rice Cooker over a pug-in-a-wall option. It makes up to 6 cups of tender flawless rice and can be tossed in a dishwasher. The rice is as fluffy as using plug-in models. Six cups of rice is enough for many recipes, but if you need to cook more rice, bigger units are also sold.
3) Mainstays 12" Nonstick Electric Skillet - I made Salisbury Steak with mushroom and onion gravy for 4 people in the skillet and it turned out just like it does on a stovetop. I let our dinner keep warm by lowering the pan's setting to 150 degrees F while we ate our 1st serving. You can sautΓ©, sear, roast, braise, and steam family-sized meals in the 4 1/2 quarts pan. The skillet is ideal for entertaining as it sits on a countertop and is easy for guests to help themselves to seconds. Best of all, the electric skillet and its tempered glass cover top are dishwasher safe minus its easily removable temperature control component.

After a neighbor's fire in 2019 left our entire NYC apartment building without cooking gas for 8 months, an electric skillet would have come in handy for making one-pan dinners. We got tired of snacks, cold cuts, and eating out, which also got costly.

Wow, 3 economical simple cookers to make home-cooked meals better and more convenient. From cooking to serving dish to dishwasher!

πŸ”πŸ₯–πŸ₯ͺπŸ”πŸ₯–πŸ₯ͺπŸ”πŸ₯–πŸ₯ͺπŸ”πŸ₯–πŸ₯ͺπŸ”πŸ₯–πŸ₯ͺπŸ”πŸ₯–πŸ₯ͺπŸ”πŸ₯–πŸ₯ͺπŸ”πŸ₯–πŸ₯ͺ

πŸ‘ΊJust for fun, here are 3 gadgets that tend to be a complete waste of money: 1) a George Foreman grill, 2) a sandwich maker, and 3) a breadmaker as you'll rarely reach for them. Tasty hamburgers, grilled cheese sandwiches, and a loaf of bread can be made as easily or consistently on a stovetop or inside an oven without special gadgets -- the reason you'll stop using them. I had a small George Forman grill. It grilled burgers no better than a frying pan on a stovetop, but I had to wash a special catch-the-meat-juices tray that is placed under, in front of it, so I gave it away. I never bought a breadmaker as I knew from experience you don't need one, and the devices seem to produce small loaves. When I bake bread I like sandwich-sized slices.

Bon Appetite at home!🍷


You may also enjoy:

Thursday, March 14, 2024

Do It Youself Meal Plans Are Cheaper


As we move into the Spring people think about dropping a few winter pounds, and I understand why some of them turn to meal programs like Jenny Craig or Nutrisystem. (The latter is the least expensive of the two.) There's no guesswork. Every bite you eat is packaged for you. The cooking and cleanup are light. It's convenient and nutritionally balanced, and if you follow it, you'll drop the weight. Years ago (around 2009), I tried Nutrisystem for 30 days. I wasn't hungry on the diet and remember dropping down to 118 pounds. As a younger woman, my loftier standard of my ''ideal weight'' was much lower. I was a size 6 - 8 for many years (without starving!). Today I'd love to step on the scale at the weight that I started with before dropping down to 118 pounds. THAT number + 20 pounds would be my ideal weight today!:)

At the same time, we also don't want to gain 10 additional pounds each and every year so our weight becomes unhealthy. Unfortunately, even without stringently high (or should I say low?) standards, you can't let yourself go! No, no, never, never, uh, uh, uh.

Today I'm going to discuss the well-known Nutrisystem meal plans. If you were to buy similar food independently and are disciplined not to cheat, but follow the plan, including its portion sizes, you could reduce the cost of the diet significantly. Moreover, I remember not liking all of the Nutrisystem meals, yet ate them because of the expense and my commitment to losing weight.

Breakfasts were a combination of protein shakes, dehydrated scrambled eggs (add water and microwave), protein muffins, and protein bars.

Here's what I think you could substitute:

* 1 dozen fresh eggs

* You're favorite high protein, low sugar meal bars - Clean and Pure Protein bars are examples. Look for at least 15 grams - 20 grams of protein with low sugar per bar.

* Protein shakes - Look for 25 grams - 30 grams per serving with low sugar and minerals. Consider buying protein powder (over liquid shakes) and adding it to skim milk for savings. Also try different brands like Premier Protein, Aldi or Trader Joe's house brands for greater savings.

Lunches consisted of canned soups and you could eat fruit or vegetable sticks that you furnish.

THE SAVVY SHOPPER has recipes for a variety of homemade soups, but this post is about convenience.

So you could buy the healthy choice varieties of any number of soups at your supermarket. Read the labels carefully focusing on low calories, salt, and at least 20 grams (30 grams if you can find it!) of protein. I will give Nutrisystem credit for sending chunky protein-rich soup, trickier to find with supermarket canned soup.

Dinners were frozen meals: meat (beef, chicken, or pork), carbohydrates (potatoes, rice, or pasta), and a vegetable, such as broccoli or peas and carrots).

Look for the many wholesome options of supermarket-carried frozen dinners. They'll likely cost less than what's on Amazon, but I'll link those for educational purposes. At the supermarket, most are half the price of a Nutrisystem frozen meal. I happen to like a brand called Healthy Choice, but there are other options also at the supermarket. Aim to find 17 grams - 30 grams per frozen dinner with 250 - 500 calories per serving. You may have to supplement some meals with a glass of milk to bump up the protein.

Snacks I liked the Nutrisystem protein chips and protein bars. The cookies and cake were good too. I was allowed 2 snacks per day. Protein chips are expensive everywhere. What's more, you don't get much in the costly bag. Consider skipping them as snacks for an ounce of cheddar (or your favorite cheese) on a saltine cracker to lower the price. Still, I'm not against expensive protein chips if they help on a diet. Spend the bucks as needed to succeed. 

I disliked Nutrisystem's dehydrated eggs. The pizza crust was as dry and flat as a cracker (which subsequently may have improved to taste like most frozen pizzas). Nutrisystem's vegetable patty on a bun was not good in taste or texture, and I thought their frozen pasta dinner entrΓ¨es were insufficient and expensive. I'll take a lean real hamburger over a Nutrisystem patty any day. It's easy to grill a raw beef burger on a stovetop. Add a slice of onion, tomato, and lettuce with ketchup, and thank me later.

Supermarkets offer all of the above meals for less than $5 - $10 each of the Nutrisystem entrèes. You'll spend far less money plus only have to eat the dishes you like!

When you buy Nutrisystem you still must buy extra fresh fruit and vegetables as they aren't packaged and mailed to you.

Nutrisystem is great at teaching people what they should eat in a day; selecting food with adequate protein, vitamins, minerals, and fiber; eating a variety of food; learning portion control; and eating when you're hungry. Also, you should and do consume 1/3 of your daily protein requirements with each meal.

Helpful tip: If you desire to follow the Nutrisystem/Jenny Craig diet on the cheap: Go to the supermarket and buy a full month's supply of alike meals + snacks to follow the plan faithfully. Do not stray from the plan. When you subscribe to the more pricey trademarks, the companies send you a box of food you eat for the month. This will put you in the same mindset for less.

Savings versus Convenience:
Finally, if you don't mind paying 3+ times the money, you avoid the work of picking Nutrisystem meal equivalents at the supermarket. The food is shipped directly to your home. Nice! I enjoyed the convenience for a short time. But. After 30 days I decided I didn't need a meal plan, as I had good eating habits and didn't mind shopping or cooking. Sometimes cleaning up seems like a repetitive chore though.

Good luck! Losing weight is hard. The older you are, the tougher it is. Cutting calories is never fun. From time to time, we all go through it. "It's a marathon, not a sprint!"


You may also enjoy:

Thursday, February 15, 2024

The Atlantic Diet Explained

Image: USA Today

Not all doctors are on board with the Mediterranean Diet, but they seem to approve of its cousin, The Atlantic Diet

Summed up from USA Today and the Today Show, the Atlantic Diet consists of eating:
  • Plenty of unprocessed fruits and vegetables
  • Lean meat and fish - singling out beef, pork, and cod
  • Eggs, milk, and cheese
  • Called "Pulses" - beans, dried peas, lentils and chickpeas
  • Olive oil and nuts - especially almonds, walnuts, chestnuts and hazelnuts
  • Lots of bread, potatoes, rice and cereal
  • Red or white wine in moderation
The Atlantic Diet focuses on eating fresh whole foods and is less restrictive than the Mediterranean Diet by allowing you to consume a generous amount of carbohydrates. On the Atlantic Diet, you can have starches 6 - 8 times a day. Still like its cousin, it lowers the risks of heart disease.

The Atlantic Diet seems balanced, doable, sensible, and delicious! No wonder doctors support following it.


You may also enjoy:

Sunday, February 11, 2024

One Pot Enchilada

Friday, January 19, 2024

My Clean Sweet Snacks List

Food takes a big bite out of a family's budget and why it's one of the subjects I write about on THE SAVVY SHOPPER. We don't have the choice of not eating, and o'man, does food take up a lot of our time from shopping for it, preparing it, and cleaning up after cooking it. We could save so much time and rid ourselves of a repetitive task if only we could stop eating! But regardless of household income, we must eat to live!

Protein bars are great to keep in the pantry for snacks and quick meals when you have no appetite or don't have time to eat. Sometimes I'll put a protein bar in my bag if an appointment will cause me to miss breakfast, lunch, or dinner. It keeps our blood sugar from plummeting. The problem with protein bars is the ones high in protein and low in sugar and calories can taste chalky and bland. Also, they are not a substitute for real food, i.e. balanced meals, which we should eat 90% - 95% of the time. 

That said, my senior mother will no longer eat her oatmeal in the mornings and overall she's become a very finicky eater, so I supplement her real food with healthy protein bars to ensure she gets sufficient protein, whole grains, and calories. 

1) Clean Protein Bars are the best-tasting protein bars I've found thus far. In addition to their great taste, I like their 15 grains of protein, their 7 grams of fiber from 6.5 grams of whole grains, as well as, their reasonable price at Walmart (which I order online). They are fairly big bars at 190 calories too. While the Clean Protein Bars' simple ingredients are a big plus, at 10 grams of sugar per bar, they are slightly over the margin of what nutritionists recommend. Ideally, protein bars should contain between 5 grams - 8 grams of sugar each, but good luck finding lower-sugar protein bars that taste good enough to eat. 

2) Occasionally I also buy Pure Protein Bars, yet at 20 grams of protein with 1 gram - 2 grams of sugar, they are too dense and chalky tasting to be as satisfying to eat. They don't taste bad, but bars that go over 17 grams of protein nearly always sacrifice texture. We reach for them less often.

With the Clean Protein Bars, I'm ok with the 10 grams of sugar in exchange for relatively high protein, moderate calorie count, and delicious taste. One characteristic to note: The bars fall apart when you eat them, so on the run, take a napkin with you!

3) South Forty Nut Bars - I love everything about this snack except the $3 per bar cost and 260 calories. Both price and calories really add up! Not as high in protein as you'd think, yet they are a nut lover's dream snack made with only a few, simple and clean ingredients. A sometimes treat because we don't love flavorless, monotonous food regardless of how nutritious it is. Perhaps a competitor will figure out how to make nut bars more affordable. Nuts are expensive!

πŸͺπŸ₯ πŸͺπŸ₯ πŸͺπŸ₯ πŸͺπŸ₯ πŸͺπŸ₯ πŸͺπŸ₯ πŸͺπŸ₯ πŸͺπŸ₯ πŸͺπŸ₯ πŸͺπŸ₯ πŸͺπŸ₯ πŸͺπŸ₯ πŸͺπŸ₯ πŸͺπŸ₯ 

4) My oatmeal cookies are healthier with less fat and sugar than most, but you do need some sugar to make cookies. They are delicious and a sometimes tasty treat especially if you're trying to get a picky eater to drink a glass of milk. Fast, easy, and cheap to bake from scratch, they contain mainly nutritious ingredients and are a complete protein with egg and nuts.

Makes 20 oatmeal cookies. Just the right amount.

My Oatmeal Cookies

Ingredients:

2 tablespoons butter
4 tablespoons (1/4 cup) brown sugar
2 tablespoons golden syrup (or substitute graduated sugar)
1 egg
1 teaspoon vanilla
3/4 cup Oats (either quick or old-fashioned, uncooked work)
3/4 cup all-purpose flour
1/2 teaspoon baking soda
1 capful of cider vinegar - Ensures a proper rise.
1/2 teaspoon each of nutmeg and pumpkin spice mix 
I add the extras below: 
1 tablespoon of raisins - Keeps the batch moist for extra days.
2 tablespoons of dark chocolate chips - You can also smash up a dark chocolate bar if you lack the chocolate chips.
2 tablespoons of white chocolate chips (Full disclosure: white chocolate isn't chocolate and has no nutritional value.:)
2 tablespoons of walnuts

Directions:

1) Using a fork, stir together the butter, brown sugar, and golden syrup.

2) Toss in the egg and mix in vanilla.

3) Add the oats, all-purpose flour, and baking soda.

4) Stir in the vinegar, nutmeg, and pumpkin spice.

5) Fold in the extras: raisins, nuts, dark chocolate chips, and white chocolate chips. At this step, I added 2 extra tablespoons of oatmeal to get a drier dough, so eyeball the consistency.

6) Refrigerate for 20 minutes or in the freezer for less time. Cold cookie dough is easier to handle.

7) I used a small cookie scooper to form and drop the dough on a cookie sheet sprayed with cooking spray. 

8) Bake at 375 degrees F for about 10 minutes. I like my oatmeal cookies crispy on the outside yet soft and done on the inside. (13 - 14 minutes makes crispy cookies, a 2nd preference.) Remove from the oven and let cool. Enjoy!
 
Moderation is the key to healthy snacks, which ideally should be no more than 200 calories. Try to make the calories in everything you eat, including sweet snacks, count!


You may also enjoy:
Diet: Safe, Simple And Sustainable

Thursday, January 11, 2024

Spanish Tortilla Using Leftovers

Wow, I turned leftovers into a Spanish omelet a/k/a a Spanish tortilla and it was scrumptious. If you have more people to feed you can double the eggs I used and toss in another potato as the dish will be much the same. I didn't want to eat leftovers of my leftovers so only used one potato and 4 eggs. The dish is fast and easy ... cooked and baked in a single 10 1/2" cast iron skillet. Here's what you do:

Spanish Tortilla

Ingredients

Drizzle of olive oil
small onion, sliced
1/2 cup celery, diced
1 large potato, sliced thin (I didn't peel mine.)
1 large fresh mushroom, sliced
1/4 cup red and green peppers
1/2 Jalapeno pepper, minced
1 cup beef, diced (I had leftover top-round beef, you can also use ham or sausage or chicken.)
1/2 cup of butternut squash, cooked and cubed
4 eggs
Cajun seasoning to taste
A sprinkle of Herbs de Provence

Directions

1) Drizzle olive oil in the bottom of a 10 1/2-inch cast iron skillet. Brown the potatoes, onion, celery, and mushroom.

2) While they are browning toss in the red and green peppers and minced jalapeno pepper, if using, to let them grill a tad.

3) Add the beef (or ham or chicken or sausage) distributing it evenly in the pan.

4) Lay in the cooked butternut squash (or another leftover vegetable).

5) After the meat and vegetables warm a bit and the potatoes and onions are brown, crack and scramble 4 eggs in a separate bowl then pour them over the other ingredients in the pan. Salt and pepper and spice the dish as you like it.

6) Bake in the oven at 350 degrees F for 20 to 25 minutes. The potatoes will need the baking to get tender. Remove from the oven and flip it over into a serving plate. Cut into wedges.

I'll be making more Spanish tortillas for dinner this year.
What a great one-pan meal when you don't have the time to let pizza dough rise. Likewise, a Spanish Tortilla is less work than making a quiche.

I love how versatile the dish is! After you grill the onions and potatoes in a little olive oil you can add nearly any vegetable (carrots, asparagus, etc.) or meat (ham, sausage, chicken, etc.) to it. Or not! You could eat it plain. Who knew grilled potatoes, onions, and eggs are sooo delicious! Spaniards and Mexicans, that's who! I could eat either cuisine every night of the week!


You may also enjoy:

Tuesday, December 19, 2023

Rita Fox’s Bourbon Fruitcake


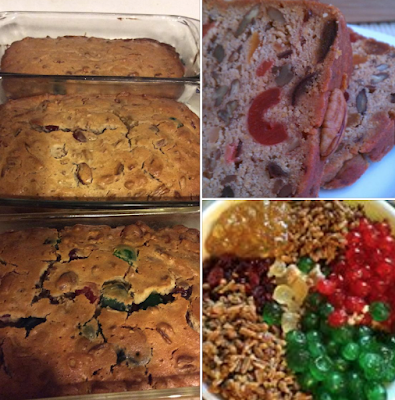
With permission, I published this recipe 4 years ago. It's the best fruitcake you will ever eat. Rita also sells them (including by mail order) as they are a lot of work to make. Gladly will I put readers in touch with the baker upon request for next year. This year, her fruitcakes are all sold. Moreover, Rita has published an awesome family cookbook. She is also an author of romance books that you can check out under her pen name Kallypso Masters.

Rita Fox’s Bourbon Fruitcake 

Modified 12/12/23 


Yield: three bread-loaf pans-sized cakes or 7 mini loaves. 


NOTE: Allow at least 4 weeks for mini cakes and 6 weeks for bread-loaf-sized cakes to be ready, so don't wait too long to start each year! I start as soon as candied fruit is available in my store, usually in late October. 


You can substitute spiced rum anywhere it mentions bourbon below. 


Ingredients 


4 cups sifted all-purpose flour 

1 teaspoon baking powder 

1 tablespoon ground nutmeg 

1 cup (2 sticks) unsalted butter, softened 

2 cups granulated sugar 

6 large whole eggs 

1/2 cup bourbon (this is just for the cake recipe, not the soaking) 

4 cups pecan pieces, soaked in bourbon

8 oz. Craisins (OR yellow or dark raisins), soaked overnight in bourbon 

1 lb. candied cherries (I use 8 oz each of red and green cherries) 

8 oz. candied pineapple 

1/2 cup orange marmalade (I don’t like citron and this is not bitter) 

pecan halves and red/green whole cherries to decorate the top of cakes, optional 


cheesecloth (each piece needs to be at least 27 inches long for a mini cake or up to 2 yards for bread-loaf-sized cakes) 


1.75 liter bottle of fine Kentucky bourbon


Method 

At least the night before mixing and baking the cakes (can also be a week before), soak Craisins/raisins and pecans in bourbon in separate containers. (I put the pecans into a quart Mason/Ball jar and the Craisins/raisins into a pint jar.) Cover and then some with bourbon, cover with foil or plastic, and put them in the fridge until ready to mix and bake. They will plump up with the liquor, so don’t overfill the jars, but try to keep the fruit and nuts covered in bourbon. 


Position a rack in the lower third of the oven and another rack below it on the lowest spot. Put a pan full of water on the lowest rack. This will add moisture to the oven when baking. Heavily butter pans. Set aside. (I don’t use spray because the butter adds richness to the cakes.) 


Sift the flour, baking powder, and nutmeg into a medium bowl. (Even if the flour says it’s presifted, I would sift.) 


In a separate, large bowl, cream the butter and sugar, beating with a mixer until the mixture is light and fluffy, about 2 minutes. (If you have a stand mixer, use it here because it will help later in the process.) Add the eggs, one at a time, blending completely after each addition. 


Drain 1/2 cup of bourbon from the Craisins then pour the rest into a small or medium bowl. Drain the bourbon from the pecans into the same bowl. Add the strips of cheesecloth to soak up the liquor. Add more bourbon as needed to fully soak the strips. Set aside. (NEVER waste good Kentucky bourbon! Or spice rum if you’re using that!)

Preheat oven to 325 F. 

Add the flour mixture to the eggs in two additions, alternating with the 1/2 cup bourbon. Stir in the pecans, marmalade, Craisins/raisins, pineapple, and cherries. The batter will be very stiff, so this is why you’ll want a stand mixer at this point. But I remember my mom mixing it by hand when I was young.

Transfer the batter to the prepared pans. OPTIONAL: Decorate the top with bourbon-soaked pecan halves and red/green whole cherries.  


Bake until a cake tester or toothpick inserted into the cake comes out clean. APPROXIMATE baking times (ovens vary; also consider altitude adjustments--be sure the tester or toothpick comes out clean in several spots not just the center): 

* bread loaf pan: 75-90 minutes 

* mini pans: 60-75 minutes 


If the top of the cake begins to brown substantially before the cake is set, cover it loosely with a piece of aluminum foil. When done, remove the cakes from the oven and let cool for 15-30 minutes on a wire rack. Run a knife down the sides to help loosen the cakes from the pans. If the bottoms of the cakes are still pale, you might want to return them to the oven for a little longer. 


When completely cool (can sit overnight), wrap each cake in a strip of bourbon-soaked cheesecloth until completely covered. 


Place the cakes in airtight, leak-free containers. I use a large Rubbermaid or Tupperware containers big enough to fit multiple cakes. 


Liberally, but slowly over the first two or three days (unless they’re already sitting in a lot of liquid), pour additional bourbon over the cheesecloth-wrapped cakes. Store the containers in a cool, dark place throughout the process and after they’re done. I don’t have a pantry big enough for all the cakes I bake anymore, so I cover them with beach towels and just leave them on the table or shelf space I have available. 


Once a day over the next two weeks, flip the cakes over so that the bourbon will run back through the cake slowly. After two weeks, be sure you don’t have any standing bourbon at the bottom of the containers any longer. You can redistribute excess liquor to another container that might need it—or use it to cook or bake something else.
When no liquid bourbon is visible any longer, you will begin to mellow the cakes. Usually at least one day during this stage, I will remove the lids to evaporate excess liquor, flipping the cakes again after 12 hours
Continue to let cakes mellow for 2-4 weeks. A week or so before you plan to serve or gift the cakes, remove the cheesecloth. (I handwash and reuse cheesecloth, or you can discard it.)

T
he cakes will keep for months (even a year if stored properly in a cool, dark place)! Continue to store in a cool, dry place. I wouldn’t freeze them, but you could put them in the refrigerator. I just store mine in a dark pantry inside a Rubbermaid container. 
To avoid crumbling when cutting: use a serrated knife and a sawing motion.  Avoid pushing the knife down and cut all the way to the base of the cake. Wipe the knife clean between cuts.

Enjoy!

πŸŽ„πŸ‘πŸͺπŸ””πŸŽ„ From Rita's family cookbook πŸŽ„πŸ‘πŸͺπŸ””πŸŽ„ 


You may also enjoy:
Coconut Macaroons ... Delish