Showing posts with label homemade. Show all posts

Thursday, January 5, 2023

Useful: Bigger Bolder Bakers' Substitute Corn Syrup & Molasses

PhoPhoto: Bigger Bolder Baker

There are two baking ingredients I never have in my pantry because I rarely need them. With these substitute recipes, I may never have to buy them. Thanks to Gemma Stafford, a former chef, I can make them at home (with ingredients I always have) for when I get a notion to bake a pastry that calls for one or the other. I love Gemma's recipes, tips, and videos but her website has so many ads and popups it's slowwww to load and murder to scroll, therefore although I'll link her website here I'm reluctant to send readers over there to be frustrated, so I'm reposting her 2 substitute recipes below also:

 I) Substitute Corn Syrup

Ingredients:

2 cups (16oz/450g) sugar
3/4 cup (6floz/170ml) water
1/4 teaspoon cream of tartar (there is no substitute for this)
2 teaspoons lemon juice (stops sugar from clumping)
a pinch of salt

Directions:

1) Toss the sugar, water, cream of tartar, lemon juice, and salt into a heavy saucepan.

2) Bring to a medium boil, stir until the sugar dissolves, then turn down the heat to a gentle boil and simmer for 15 to 20 minutes until the mixture reduces quite a bit. Once cooled the syrup thickens. 

Photo: Bigger Bolder Bakers

II) Substitute Molasses

Ingredients:

2 cups (16oz/450g) dark brown sugar
3/4 cups (6floz/170ml) water
1/4 teaspoon cream of tartar
2 teaspoons lemon juice freshly squeezed

Directions:

1) In a heavy saucepan over medium heat, add the dark brown sugar, water, cream of tartar, and lemon juice. Stir to dissolve the sugar.

2) Once the sugar dissolves, reduce the heat and simmer for 4 - 5 minutes until the mixture thickens. Cool and store in a sealed glass jar.

Gemma is an excellent baker and teacher and you should check out her how-to YouTube videos, but oi vay that website!

*****************************************************************************

So now let's bake something!

All blondie photos and recipe courtesy of ATK

Let's use our homemade corn syrup to make America's Test Kitchen's Brown Butter Blondies -- linked here -- another website with inconveniences that you can overcome by watching its videos on Youtube.

Ingredients:

2 1/4 cups all-purpose flour
1 1/4 teaspoons table salt
1/2 teaspoon baking powder
12 tablespoons unsalted butter
1 3/4 cups packed light brown sugar
3 large eggs
1/2 cup corn syrup
2 tablespoons vanilla extract
1 cup pecans, oven-toasted and chopped coarsely
1/2 cup milk chocolate chips
1/4 - 1/2 teaspoon flake sea salt, crumbled

Prepare a 13 x 9-inch baking pan with 2 sheets of aluminum foil with flaps (and crisscrossed +) so that you can lift the blondies up out of the pan after they are baked. Make sure you press the foil into the 4 corners of the pan and grease or use cooking spray on the foil.

Directions:

1) In a mixing bowl, whisk together the dry ingredients: flour, salt, and baking powder.

2) Melt the butter in a 10-inch skillet. Over medium heat, simmer the butter, whisking throughout until it's golden brown and has a nutty aroma, which gives the blondies a butterscotch flavor. Transfer to a large heat-proof mixing bowl.

3) Add the sugar to the hot butter and whisk. 

4) Next add the eggs, corn syrup, and vanilla. Whisk until smooth.

5) Stir in the flour mixture until fluffy. Test Kitchen uses a spatula to incorporate the ingredients.

6) Stir in the pecans and chocolate chips.

7) Spread evenly into the prepared baking pan and sprinkle to top with the flaked sea salt.

8) Bake in a preheated 350 degrees F oven for 35 - 40 minutes (turning the pan around at 20 minutes) until golden brown and the cake springs back to the touch.

9) Let the blondies cool completely in the pan before lifting the foil with the pastry out of the pan and onto a cutting board. Makes 24 bars.

Sometimes it takes a professional baker to perfect a substitution that works in our recipes. Thank you, Gemma Stafford (and Test Kitchen for the best blondies). Who wants to run to the supermarket every time you turn around, not to mention, stock 2 ingredients you rarely use! Now there's no need to do either.

You may also enjoy:

Friday, July 29, 2022

Homemade Window And Stainless Steel Cleaners

Photo and linked article Bob Villa - with his advice 

I'm not against using Windex to clean glass or windows, but the size of the bottle keeps shrinking, and I'm simply tired of restocking it! Sooo, I stopped buying Windex. Now I buy a 32-ounce bottle of pure ammonia. Mix it with water -- about 1 part ammonia to two parts water poured into a spray bottle -- and 
voilà ... use it to clean glass; mirrors; counters; sinks; sometimes a bathroom floor; other surfaces; toilet bowls (avoid pouring it in the tank since over time ammonia could damage the mechanisms inside the tank), as well as, for wiping down big and small appliances. Saves time and money with less restocking: Dilute, delete, and next!

Check out Bev's chart.
Another offering for Streak-free Window Cleaner can be made by pouring: 1 cup water, 1 cup rubbing alcohol, and 1 tablespoon of white vinegar into a spray bottle. Frankly, I don't waste my alcohol making this one since a little extra rubbing with a clean paper towel after a spritz of the ammonia and water mixture works as well ... and to my satisfaction. 

Next up: A Stainless Steel Cleaner is a tad harder to replace but not impossible. As it turns out, I find bottles of stainless steel cleaner at T.J. Maxx for $3 - $4 so continue to buy them. IMHO nothing works quite as well. What's more, making stainless steel cleaner is not a one, but two-step effort, therefore more time-consuming. In a pinch, here's how: Use white vinegar to break down grease and grime. The 5% acid in white vinegar will not hurt your stainless steel.

Repeat the spritz and wipe if needed. (There is a 6% acid white vinegar that is also safe to use if you feel like hunting for it. I'm trying to reduce not add another product and job to my cleaning routine. 5% ... sold!)

Next polish the stainless steel with food-grade oil. People commonly use olive oil, but home building expert, Bob Villa's websitesays to use food-grade mineral oil to avoid the risk of the olive oil going rancid with prolonged sunlight. For sure expert advice, although I've never heard of food-grade mineral oil ... and I bet it's more expensive than my $3 Stainless Steel Cleaner, which is readymade! So in a pinch (of running out of Stainless Steel Cleaner), I would use olive oil. Shhhh, we won't tell Bob Villa!

In looking for photos after writing today's blog, I stumbled upon  Bev's The Make Your Own Zone blog, which looks awesome! Join me in checking out her website for useful tips. Like me, I bet she settles for plain ole 5% white vinegar and olive oil in her cleaners in lieu of running around town to find stuff nobody ever buys.😛


You may also enjoy:

Friday, October 8, 2021

Faux-Reos: When To Make Homemade Cookies?

Photo and recipe courtesy of King Arthur Baking Co.

Everyone should know where his or her food comes from, what's in it and what it takes to put it on the table, so I think everybody should have a few basic cooking or baking skills.
🙂 Often homemade is healthier as you use better ingridients. That said, life is a balance. Who wants to spend all their time in the kitchen? So how do I decide between homemade or readymade?

If I can't make food, better, healthier, or cheaper, I buy it readymade. Oreos are one of my favorite store-bought cookies. I can't make them better than Nabisco Cadbury Milka, their manufacturer ... and not much cheaper either. 

Moreover, are cookies ever healthy? Really ... truly?! It's the sugar that's so bad for us ... as well as, eating too many cookies! So Oreos are a cookie I buy and never bake at home. BTW, if you can find the same crispy chocolate sandwich cookie manufactured by Hydrox, the original inventor of the recipe in your supermarket, buy them. As tasty as Oreos, Hydrox -- the 1st retailer to make them -- deserves your patronage!

Despite never making the chocolate sandwich biscuit myself, I'm curious to know what's in my favorite, sooo delicious, store-bought cookie. Let's turn to a professional baking company for a copycat recipe:

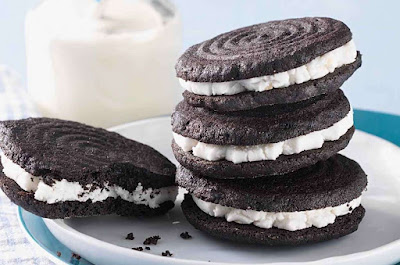
Faux-Reos by King Arthur

Ingredients for the cookie:

1 cup + 2 tablespoons sugar
12 tablespoons butter, room temperature
1/2 teaspoon salt
1 teaspoon espresso powder
1 large egg
1 tablespoon cold water
1 teaspoon vanilla extract
1 1/2 cups unbleached all-purpose flour
3/4 cup good quality cocoa

Directions for the cookie:

1) In a mixing bowl, beat together the sugar, butter, salt, and espresso powder. 

2) Beat in the egg, water, and vanilla. Next add the flour and cocoa (to get a stiff dough with no leavening agent, so do not worry about either).

3) Roll the dough into 2 teaspoon-size balls (the weight of a chestnut).

4) Place the balls on a greased, or parchment paper prepared cookie sheet, leaving 1 1/2'' - 2'' apart.

5) Flatten each cookie to about 1/8" with your fingers or a glass bottom dipped in cocoa.

6) Bake the cookies for 18 - 20 minutes and watch them closely to get a crispy-without-scorched cookie. When just right, remove them from the oven and cool completely.

Ingredients for the filling:

2 1/2 cups powdered sugar
1/2 cup vegetable shortening
1 teaspoon vanilla extract
2 teaspoons cold water

Directions for the filling:

1) Beat together the sugar, shortening, and vanilla.

2) Add the water and continue to beat until smooth and spreadable.

3) Place 1 tablespoon of filling in-between 2 crispy cookies and squeeze to flatten.

Oh, what a lot of sugar, no wonder they're so tasty! Frankly, unless Oreos and Hydrox cookies both disappear from supermarket shelves, I don't plan to make them. Yet seeing the recipe is an education, isn't it ... and I'll hold onto the Faux-Reos recipe to make at home should the day arrive of empty supermarket shelves.

++++++++++++++++++++++++++++++++++++++++++++++++++

Here's another easy King Arthur recipe I will make:

Photo and recipe courtesy of King Arthur Baking Co.

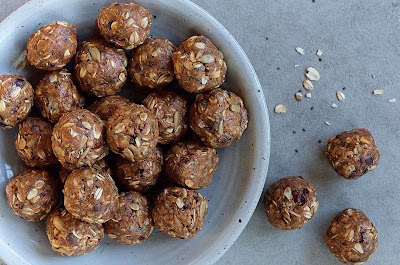
No-Bake Energy Bites

Ingredients:

3/4 cup any nut butter (I'll use peanut butter)
1 cup of rolled oats
1/3 cup of honey
1/3 cup of dried whole milk (I'll use dried skim milk ... all I ever buy and doubt with powdered milk, it makes much of a difference in taste. What am I ... a supermarket?🙂)
1 teaspoon vanilla extract
Select:
2 cups of mix-ins - such as mini chocolate chips, coconut flakes, chopped nuts, dried fruits or seeds, crushed candies (unhealthy), 1 tablespoon chia or poppy seeds (healthy) -- or whatever you like.

Directions:

1) In a mixing bowl, combine the 1st 5 main ingredients.

2) Next add 2 cups of whatever mix-ins you like.

3) Use your hands to mix and get the right consistency. Add more oats if too sticky, add a tad more honey if too dry.

3) Form into 1 tablespoon-size balls. Place on a cookie sheet. Wait at least 20 minutes for them to rest and firm up before eating.

Obviously, the Energy Bites are healthier than Oreo cookies, but sometimes you need an Oreo; and we all must practice moderation. Alas, staying healthy always comes down to portion control! I rarely eat more than 3 Oreos, yet rarely eat less than 3.🙂


You may also enjoy:

Thursday, August 19, 2021

Test Kitchen's Cast Iron Baked Ziti with Charred Tomatoes

All photos courtesy of America's Test Kitchen (Click ATK to watch.)

America's Test Kitchen, the television show, shared this recipe as a non-subscription freebie. It's a one-cast-iron-skillet dinner that promises to be as delicious as the more complicated, multi-pots-and-pans method of making baked ziti. The only other kitchen tools you'll need are a cutting board and a sharp knife. 
As usual, I like to post a winning recipe on THE SAVVY SHOPPER so I, too, can return here to make it again.

Food takes a big bite out of a budget, yet knowing how to cook ensures you eat healthy and delicious meals without a struggle. Now let's get cooking ...

Cast Iron Baked Ziti with Charred Tomatoes

Ingredients:

1 1/2 lbs grape tomatoes
1 teaspoon extra virgin olive oil
1 teaspoon salt
6 garlic cloves, minced
1 teaspoon tomato paste
1/4 teaspoon of red pepper flakes
12 oz of uncooked ziti
3 cups of water
1/2 cup parmesan cheese
4 oz of mozzarella cheese, grated
1/4 cup of fresh basil, chopped
Salt and pepper to taste

Directions:

1) Heat the tomatoes mixed with extra virgin olive oil and salt in a preheated 12 inch cast iron skillet and cook on medium-high for about 10 minutes, stirring periodically until the tomatoes are charred.

2) After the tomatoes are charred and start to break up, add the minced garlic, tomato paste, and red pepper flakes. Stir and cook for about 30 seconds more, or until you smell the garlic.

3) Turn off the heat and using a potato masher, mash the charred tomatoes into a sauce.

4) Next toss the uncooked ziti pasta into the skillet along with 3 cups of water.

5) Turn the heat back on high to bring it to a boil.

6) Reduce the heat and let the pasta cook under a lid, stirring often to prevent sticking until the noodles are al dente. This takes about 10 -12 minutes. Make sure the ziti cooks under the liquid to tenderize and watch as the liquid evaporates for consistency that is not too wet or too dry.

7) Next mix in the parmesan cheese and fresh chopped basil.  Also, salt and pepper to taste.

8) Top the dish with mozzarella cheese.

9) Finally place the cast-iron skillet into a preheated broiler setting in the oven. Stay with it by the stove. Let the cheese melt and brown, but watch carefully so neither the cheese nor pasta burns.

Cast iron skillets get blazing hot, and after pulling the ziti out of the oven, you'll have to wait for it to cool down. 

How I adore one-pan meals ... definitely, a keeper recipe, and an easy-peasy cleanup! The only tweak I made was to reduce the recipe by 1/3 so it fits into my 10 1/2 inch cast iron skillet. I also charred small plum tomatoes instead of grape tomatoes.
My Italian readers will cringe over a few substitutions: Although it is baked ziti, you could use curly noodles if it's what you have in the pantry or jarred tomato sauce in the winter. When I need a quick meal for just myself, I'm not above using #8 spaghetti noodles, and after plating it, melting the topped mozzarella in the microwave. [Yikes, did I just admit it? It is my way of making one tasty serving of pasta with no leftovers.] However, for guests make the dinner the Test Kitchen restaurant-worthy way. So easy and delicious. Enjoy!


You may also enjoy:

Thursday, August 1, 2019

Homemade Hoisin Sauce And Sweeten Condensed Milk Are Cheap

Photo: sugarapron.com
I don't know why certain foods are sky high when their ingredients are dirt cheap. Sometimes it's the labor involved in making them, but not always. Condiments costing more than meat, which consist of few ingredients that take little time to pour together I will make myself from now on. Plus I'll use top ingredients!

Allow me to illustrate with savory and sweet examples. Let's start with a recipe for the savory condiment. Since it's so easy to prepare, why buy it?:

Homemade Hoisin Sauce
On amazon here

Ingredients:

4 tablespoons soy sauce
2 tablespoons peanut butter
1 tablespoon honey (molasses, or brown sugar)
2 teaspoons vinegar (I use cider or white)
1/8 teaspoon garlic powder
1/8 teaspoon black pepper
1 teaspoon hot sauce (I use Sriracha)

Directions:

Pour the ingredients into a bowl and whisk them together. Done!!

Hoisin sauce is used in Chinese stir fry dishes. 

For a fast meal, I stir fry 16 ounces of cut broccoli, 3 chopped carrots, 3 sliced stalks of celery, one sliced red pepper, 1 medium chopped onion and  2-3 cloves of minced garlic. I toss the ingredients directly into a Wok pan, stir-fry and cover with a lid to let the vegetables tenderize on low heat while waiting for 1 cup of brown rice, or quinoa to cook on a 2nd burner. The liquids from the vegetables and Hoisin recipe will make enough sauce. When the vegetables are nearly done, cube 16 oz of of tofu and toss into the stir fry mixture. After the vegetables are no longer raw, simply turn off the burner and wait for the rice to catch up on the 2nd burner. Brown rice, or quinoa requires 1/2 hour to tenderize. Delish!

🍴🍴🍴🍴🍴🍴🍴🍴

My 2nd recipe requires a little bit of prior planning, but the savings of homemade are substantial:

Sweetened condensed milk is a condiment often used to make cookie bars or boiled caramel, but why is it so ridiculously expensive? A 14 ounce can sells for over $4; yet the 2 ingredients used to make it are relatively cheap. I don't think making it is so labor intensive, it justifies such a steep markup:

Homemade Sweeten Condensed Milk
On Amazon here

Ingredients:
For each cup of finished sweetened condensed milk --

2 cups milk
2/3 cup sugar

Directions

1) Completely dissolve the sugar into the milk by whisking it before you heat the sauce pan.

2) After the sugar is completely dissolved into the milk, turn on the flame and the second the mixture simmers, lower the heat so it never boils. There is no more need to stir it, just let the pot simmer on a low heat.

3) Simmer it for 30 to 40 minutes until the liquid thickens into condensed milk. 

4) Remove from the stove and skim off any cooked milk skin or brown edge that you see.

5) Let the mixture cool in order to use, or store into a jar for later.

Until this year, I never tried to make these condiments myself. But why not? It's silly to pay $3 per pound of meat and nearly $5 for a can of condensed milk. (As you can guess that one irks me the most! Dear Milk Robber Barons, from this day forward, my money stays in my pocket.). 

After we know how simple and cheap a few condiments are to make, ignorance is no longer bliss! What did you buy before you leaned how to make it?


You may also enjoy:
Let The Barbecues Begin
The Best Cookbooks Ever  
Greenmarkets, Community Gardens And CSA's
Stir-Fry Spicy Tofu With Broccoli And Red Pepper